Applies to: Microsoft ® Word ® 2016, 2019, 2021 and 365 (Windows)
You can create a hanging indent in Microsoft Word using the Ruler, the Paragraph dialog box or a keyboard shortcut. A hanging indent is created when the first line of a paragraph is at a location to the left of the subsequent lines in the paragraph. The term is often used to refer to a first line indent. Either way, the first line of a paragraph is indented or outdented. A hanging indent is typically used for bullets and numbering or to cite a reference. The bullets and numbering tools automatically apply a hanging indent.
In this article, we'll review 4 ways to create a hanging indent in Word:
Hanging indents are applied to paragraphs and a paragraph in Word is anything with a hard return after it (you have pressed Enter or Return). If you want to create a hanging or first line indent in a multi-line paragraph, there should not be hard returns at the end of each line of text.
It's helpful to view paragraph marks when working with hanging indents. To view hard returns or paragraph marks and other non-printing characters in Microsoft Word:
Do you want to learn more about Microsoft Word? Check out our virtual classroom or in-person Word courses >
A common way to create a hanging or first line indent is to use the Ruler. If the Ruler is not displayed at the top of the document, click the View tab in the Ribbon and select the Ruler checkbox.
To create a hanging using the Ruler:
In the following examples, the first line indent marker and the left indent marker are at different locations on the Ruler:
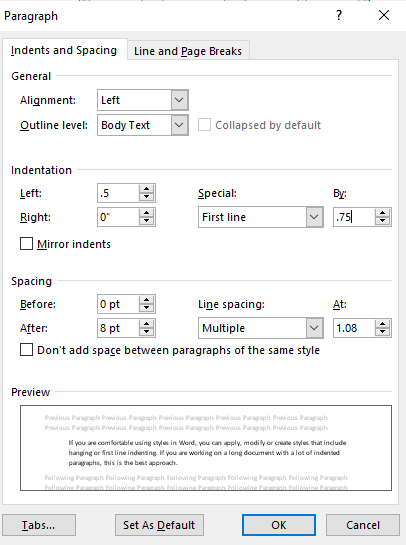
To create a hanging or first line indent using the Paragraph dialog box:
In the following example, indents have been entered for the Left and First Line in the Paragraph dialog box (in this case, entered in inches):
You can press Ctrl + T to apply a hanging indent to a paragraph. This shortcut will move all lines except the first one to the next tab stop. If there are no user-defined tab stops in the paragraph, Word indents to the first default tab stop. If you keep pressing Ctrl + T, Word will keep indenting by tab stop to the right.
Press Ctrl + Shift + T to decrease or remove the indent (move to the left).
If you click at the beginning of a paragraph and press Tab, Word will indent the first line to the first user-defined tab stop or the first default tab stop.
When you apply bullets or numbering, Microsoft Word changes the indents of the first and following lines in a paragraph or paragraphs automatically.
If you are comfortable using styles in Word, you can apply, modify or create styles that include hanging or first line indents. If you are working on a long document with a lot of indented paragraphs, this is the best approach.
Did you find this article helpful? If you would like to receive new articles, JOIN our email list.